


Instructions
Instructions for Use
HITCHRIFIC® REEL-QUIK HITCH
MUST READ - SAFETY FIRST!!
Towing is a potentially dangerous activity and close attention to proper procedures is required to avoid accident or injury.
Your new REEL-QUIK HITCH is designed to assist in the fast and safe hook up of a trailer to the towing ball. The mechanism will extend the ball rearward and adjust to position the ball directly beneath the trailer coupler. This allows hook up to the ball in seconds. Then the patented REEL-QUIK action will pull the ball and the attached trailer into locked towing position. Be sure to read the entire instruction manual before using this device.
WARNINGS
- ==> ALWAYS ATTACH YOUR TRAILER ON LEVEL GROUND.
- ==> Before each use, be sure to inspect hitch receiver carefully. Check for cracked welds around the mouth of the receiver possibly caused by repeated overloading. Replace REEL-QUIK HITCH if any component is bent.
- ==> DO NOT MOVE the trailer without properly attaching the safety chains. Chains should be rated for 6,600 pounds working limit.
- ==> Always test your tow load at low speed for stability before attempting higher speeds.
- ==> If the tow vehicle or trailer is involved in an accident, the REEL-QUIK HITCH MUST be replaced. Crashes can cause hidden damage to the REEL-QUIK HITCH that may cause future problems even though a physical inspection may show no apparent damage.
- ==> The REEL-QUIK HITCH has been thoroughly tested and analyzed to establish that it is safe for use and meets or exceeds all safety standards. However, improper use can damage the unit.
- ==> Any cracking or bending of parts is evidence of overloading and the REEL-QUIK HITCH should be replaced immediately.
- ==> This installation and instruction guide should be kept in tow vehicle at all times.
CONTACT HITCHRIFIC
Hitchrific
1 Mallard Point Cove
Little Rock, AR 72223
501-821-0000
NOTE: Manufacturer will not be held responsible for any or all claims made arising from improper use.
UNPACKING AND INITIAL SETUP
CAUTION! Your REEL-QUIK HITCH is heavy, weighing over 40 pounds. When unboxing and setting up, be sure the work surface you choose can support the weight of the mechanism and will not be damaged by its weight.
The REEL-QUIK HITCH is packed for shipment with a double carton. Retailers may have removed the plain, cardboard outer carton which will leave the white box with the color graphics to open.
- 1. Place the carton on a solid work surface. Cut the tape on the top of the carton and remove the REEL-QUIK HITCH contents.
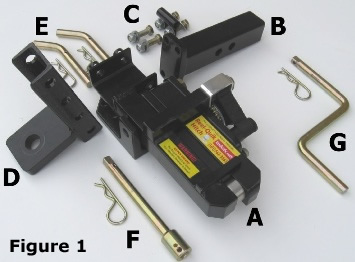
- 2. There will be seven (7) components as show in Figure 1.
- A. Main Body
- B. Receiver Insert
- C. Bolts, Lock Nuts, Crank Handle Storage Bracket
- D. Ball Mount (height adjustable)
- E. Securing Pins, Clevis Pins
- F. Locking Pin, Clevis Pin
- G. Crank Handle, Clevis Pin
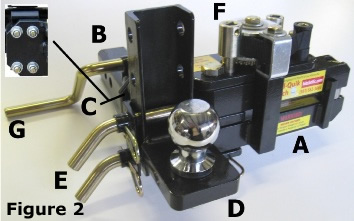
3. Attach the Receiver Insert (B) to the Main Body (A), using the four Bolts and Locking Nuts (C). The two top bolts and lock nuts will also attach the Crank Handle Storage Bracket (C) to the Receiver Insert (B). See Figure 2.
Note: You will need to release the gear pawl and move the lower arm of the Main Body (A) to gain clearance to insert the four bolts. Tighten the lock nuts and bolts with 19mm or 3/4" wrench to approximately 70 ft. lbs. of torque.
4. Attach the Ball Mount (D) to the end of the Main Body lower arm using the two Securing Pins (E). Secure with Clevis Pins as show in Figure 2. Note: The Ball Mount has a series of five adjustment holes that will permit different height settings depending on the height required for the towing vehicle.
5. Insert the Locking Pin (F) as shown in Figure 2, and secure with Clevis Pin.
6. Insert the Crank Handle (G) into the Crank Handle Storage Bracket (C) as shown in Figure 2, and secure with Clevis Pin.
7. Select the proper ball size for the trailer to be towed (tow ball not included). Be sure to use a ball with a 1” shank that will match the hole on the HITCHRIFIC® REEL-QUIK ball mount.
8. Tightening the ball will be easier after inserting the unit into the towing vehicle’s 2” x 2” receiver.
Generally the ball position is set about the middle of the main body.
MOUNTING TO VEHICLE AND ADJUSTING THE HEIGHT
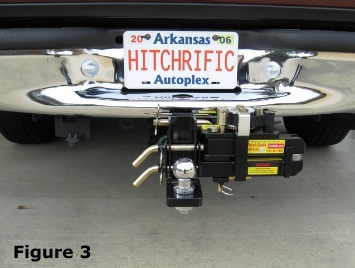
The Receiver Insert (B) should slide into any standard 2” receiver and secure with a hitch pin. The Ball Mount (D) height may be adjusted easily by removing the Securing Pins (E) and selecting different hole settings. In addition, optional extra ball mounts (D) are available for quick change of ball sizes or reverse mounting. Once secured to the vehicle, the HITCHRIFIC® REEL-QUIK HITCH and ball should be latched to the trailer’s coupler as any other ball mount. See Figure 3. Always be sure that the correct size ball is matched to the trailer being pulled.
Hitch Balls - Select your hitch ball by gross trailer weight. Hole diameter must not exceed the shank diameter by more than 1/16 of an inch. Always use a lock washer. Torque to manufacturers specifications. When the hitch ball has been tightened, the shank must protrude through the bottom of the nut. Note: Hitch ball not included, see your dealer for the correct unit for your application.
Safety Chains - Connect your safety chains every time you tow. Crisscross the safety chains under the trailer coupler.
Always attach the safety chains to the tow vehicle so the trailer cannot bounce loose. Be sure to leave enough slack for vehicle turning.
The chains should never be allowed to drag on the ground.
Check your REEL-QUIK HITCH Frequently - Check your HITCHRIFIC® hitch ball, trailer coupler, safety pins, chains, light connections and
any other towing safety equipment before you tow EVERY TIME.
Always take time during longer trips to check and recheck the above.
TRAILER HOOK-UP
The HITCHRIFIC® REEL-QUIK HITCH is designed to make the process of trailer hook-up fast and easy. The REEL-QUIK HITCH will reach the ball to the trailer coupler eliminating the need for the vehicle and ball to be perfectly aligned during hook-ups. The process for hook-up is:
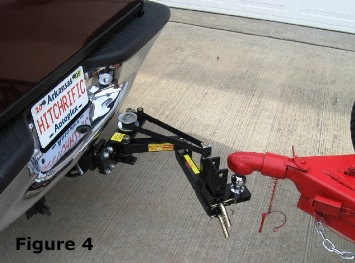
1. Back the vehicle and hitch ball towards the trailer coupler but stop short of the trailer coupler. For best results, position the ball slightly towards the driver’s side of the trailer coupler and from 6” to 12” short of the trailer coupler. See Figure 4.
2. Remove the Crank Handle (G) from the Storage Bracket (C).
3. Remove the 8” Locking Pin (F).
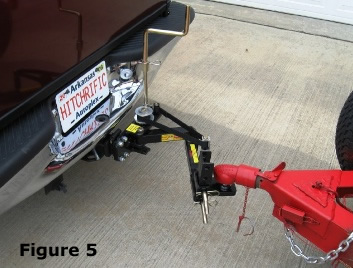
4. Insert the 8” Locking Pin (F) into the small gear’s socket and attach the Crank Handle (G) to the 8” Locking Pin (F) using Clevis Pin. See Figure 5.
5. Slightly turn the gear socket counter clockwise to release the pawl by hand.
 6. Pull the ball and lower arm to position ball directly under trailer coupler. See Figure 4.
7. Lower trailer coupler with trailer jack onto the ball and lock back in place. See Figure 5.
8. Latch pawl with gear socket and crank gear counter clockwise until ball coupler, and trailer are reeled into towing position and locking pin holes are in alignment. See Figure 6.
9. Remove Crank Handle (G) and Locking Pin (F).
10. Insert 8” Locking Pin (F) through holes in Main Body (A) and secure with Clevis Pin.
11. Store Crank Handle (G) by sliding into Storage Bracket (C) and secure with Clevis Pin.
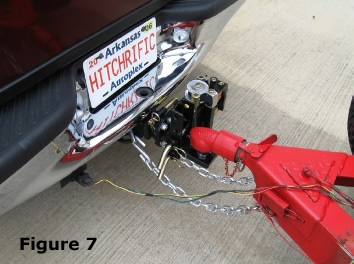
12. Attach safety chains and connect electrical connector. See Figure 7.
CARE AND MAINTENANCE

Your HITCHRIFIC® REEL-QUIK HITCH should be inspected regularly. Look for cracks in welds and bent parts before every use. You should not use the REEL-QUIK HITCH if any are noted. Rusty spots should be sanded and touched up as needed. The gear teeth should be lubricated with a marine wheel bearing grease as needed. Spray lubricant can be used on all moving parts. If your HITCHRIFIC® is covered with dirt or mud, hose or power wash, dry and apply grease to the upper and lower arms.
PRODUCT WARRANTY
HITCHRIFIC®, a division of Arkansas Autoplex, LLC., warrants its ball mounts from the date of purchase against defects in material and workmanship under normal use and service, ordinary wear and tear for 90 days from the original customer purchase date.
HITCHRIFIC® will replace free of charge any part which proves defective in material or workmanship when presented or returned to the factory. Transportation charges pre-paid a the address below.
 THIS WARRANTY IS LIMITED TO DEFECTIVE PARTS REPLACEMENT ONLY.
LABOR CHARGES AND/OR DAMAGES INCURRED IN INSTALLATION OR REPLACEMENT AS WELL AS INCIDENTAL AND
CONSEQUENTIAL DAMAGES CONNECTED THEREWITH WILL BE EXCLUDED.
Some states do not allow the exclusion or limitation of incidental or consequential damages, so the above may not apply to you.
